
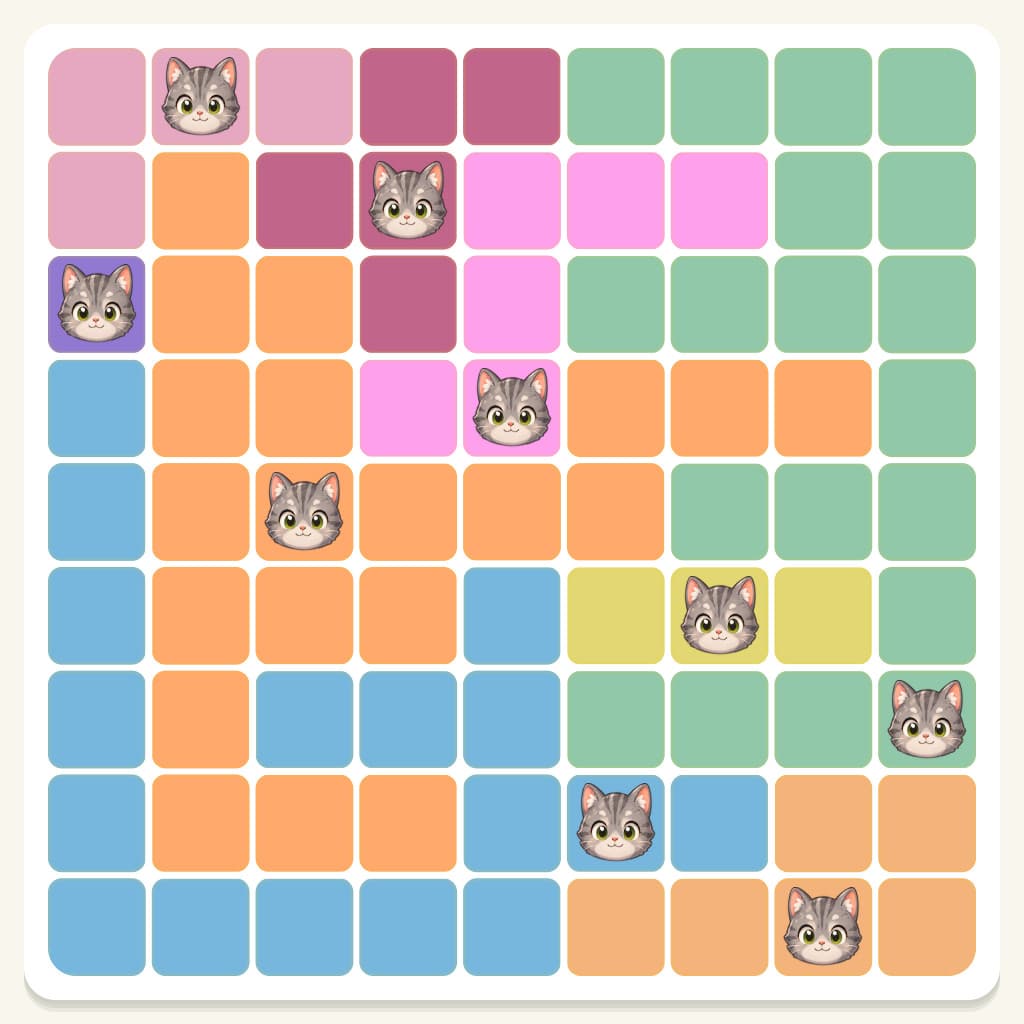

Meowdoku Level 224 Step-by-Step Logic Walkthrough & Explained
Follow the replay below. Each board shows the result after applying that step.
Meowdoku Level 224 Step 1: Place cat at R3 C1: only legal cell

Place a cat here at . The sky blue region has no other legal cell.
Meowdoku Level 224 Step 2: Mark X at R1 C4, R1 C5, and R1 C6 + 3 more: a region is locked to this row
The purple region must use row 1. No other region can use that row. Mark the highlighted cells with X.
Meowdoku Level 224 Step 3: Mark X at R2 C5, R2 C6, and R2 C7 + 2 more: a region is locked to this row
The orange region must use row 2. No other region can use that row. Mark the highlighted cells with X.
Meowdoku Level 224 Step 4: Mark X at R4 C3, R4 C6, and R4 C7 + 2 more: a region is locked to this row
The green region must use row 4. No other region can use that row. Mark the highlighted cells with X.
Meowdoku Level 224 Step 5: Mark X at R6 C2, R6 C3, and R6 C4 + 2 more: a region is locked to this row
The magenta region must use row 6. No other region can use that row. Mark the highlighted cells with X.
Meowdoku Level 224 Step 6: Mark X at R2 C3: cats cannot touch
Every possible cat for the purple region conflicts with these cells. Cats cannot share a row, column, region, or diagonal touch. Mark the highlighted cells with X.
Meowdoku Level 224 Step 7: Place cat at R2 C4: only legal cell
Place a cat here at . The orange region has no other legal cell.
Meowdoku Level 224 Step 8: Place cat at R1 C2: only legal cell
Place a cat here at . The purple region has no other legal cell.
Meowdoku Level 224 Step 9: Place cat at R4 C5: only legal cell
Place a cat here at . The green region has no other legal cell.
Meowdoku Level 224 Step 10: Mark X at R7 C3 and R9 C3: a region is locked to this column
The rose region must use column 3. No other region can use that column. Mark the highlighted cells with X.
Meowdoku Level 224 Step 11: Mark X at R8 C3, R8 C8, and R8 C9: a region is locked to this row
The yellow region must use row 8. No other region can use that row. Mark the highlighted cells with X.
Meowdoku Level 224 Step 12: Place cat at R5 C3: only legal cell
Place a cat here at . The rose region has no other legal cell.
Meowdoku Level 224 Step 13: Mark X at R7 C7: cats cannot touch
Every possible cat for the magenta region conflicts with these cells. Cats cannot share a row, column, region, or diagonal touch. Mark the highlighted cells with X.
Meowdoku Level 224 Step 14: Mark X at R7 C6, R9 C6, and R9 C7: cats cannot touch
Every possible cat for the yellow region conflicts with these cells. Cats cannot share a row, column, region, or diagonal touch. Mark the highlighted cells with X.
Meowdoku Level 224 Step 15: Mark X at R6 C8: rows or columns are reserved
The teal and pink regions must use columns 8 and 9. No other region can use those columns. Mark the highlighted cells with X.
Meowdoku Level 224 Step 16: Mark X at R7 C8: cats cannot touch
Every possible cat for column 7 conflicts with these cells. Cats cannot share a row, column, region, or diagonal touch. Mark the highlighted cells with X.
Meowdoku Level 224 Step 17: Place cat at R7 C9: only legal cell
Place a cat here at . The teal region has no other legal cell.
Meowdoku Level 224 Step 18: Place cat at R9 C8: only legal cell
Place a cat here at . The pink region has no other legal cell.
Meowdoku Level 224 Step 19: Place cat at R8 C6: only legal cell
Place a cat here at . The yellow region has no other legal cell.
Meowdoku Level 224 Step 20: Place cat at R6 C7: only legal cell
Place a cat here at . The magenta region has no other legal cell.
Meowdoku Level 224 Result
All 9 cats are placed correctly:
- R1 C2
- R2 C4
- R3 C1
- R4 C5
- R5 C3
- R6 C7
- R7 C9
- R8 C6
- R9 C8